How to:
Many thanks to fixya.com contributors for
info (not all appears correct to me -- but special thanks to Lou and Andrew -- that helped!). Here are some photos & notes from
my particular experience that may be interesting.
I guess my saw (Craftsman 358.360180 / 358360180) with Walbro WT-624 carburetor is about 15 years old with lots of hours on it. Anyway, it just stopped working this summer -- the fuel lines inside the fuel tank had disintegrated so badly that the carburetor couldn't get fuel, and it took a lot of research to figure out how to replace the lines, which had broken up inside the fuel tank.
-------Sidebar-----------
I didn't document it here, but you can see youtube videos explaining how to get the new narrower fuel-line from the upper fitting (fuel-pump) on the Walbro WT-624 carb (other carbs may be set up differently) through the smaller hole into the fuel tank and onto the fuel filter. Long story short:
1.
I cut a long (~one-inch) slant-cut into the lead-end of the narrower fuel-line;
2.
used a sewing-needle to thread some high-test fishing line (doubled-over, as this is a doozy of a pull) through the lead-end of the fuel-line a few millimeters from the lead-end tip;
3.
used needle-nose-pliers to push-and-pull the narrower fuel-line itself through the smaller port into the fuel tank as far as I could via that method;
4.
slowly pulled it the rest of the way in with one hand pulling the fishing line and with one other thumb inside the fuel-tank to lower the angle to try to keep the pulling-through force as close to 90-degrees as possible so as to not break the fuel-line with excessive force on the fishing-line thru the needle-hole;
5.
snipped the lead-end of the fuel-line to square;
6.
forced the fuel filter into the now-squared-off lead-end of that narrower fuel-line;
7.
gently pulled some of that narrower fuel-line back up and out of the tank so the fuel-filter rests at the back/bottom of the fuel tank
8.
snipped that narrower fuel-line long enough to reach the upper fuel-fitting on the carb and short enough to not hog-up too much space under the carb
(saving the rest of the fuel-line for another replacement in 2033? -- one can hope!)
-------End-Sidebar-----------
I bought a kit on amazon or ebay with two lengths of fuel-lines of two different widths, a spark plug, air filter, fuel filter, and primer bulb for about $8. I've only replaced the fuel lines as of this writing.
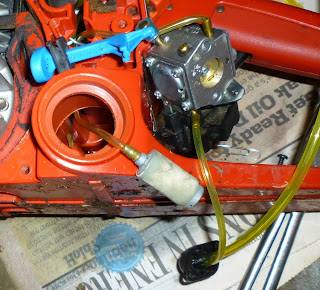
The nib -- I think it's just put in there to keep the (wider-size) return line from popping out of the tank:
You may be able to see the old (wider-size) return-line going into the tank. I got the nib off and out of it with a pair of VERY long, thin, needle-nose pliers, and then I yanked-out the old return-line:
The old (wider-size) primer-bulb-to-tank-return-line (with the nib put back in) for estimating the length for the new replacement (wider-size) line:
(I had hoped to reuse the old return-line,
but it had become too loose -- it kept popping off the primer-bulb.)
Pulling the lines into the tank is not too hard if you have LONG, NARROW needle-nose pliers (I bought "
11 in. Long-Reach Needle Nose Pliers" $3.99 from Harbor Freight Tools -- they worked fine), but it is slow work, especially until you get a feel for it. I cut a 1-inch-long slant cut at the
lead-end of the line as generally suggested. Some suggest a bit of motor oil applied to the outside of the line can help. I didn't have any clean motor oil, so I used the 40:1 gas/oil mix from the chainsaw's refueling supply. (Edit: in retrospect, I wonder if a light coating of silicone spray might have worked much better.) Even so, I had to leverage the pliers on the upper edge of the fuel-filler mouth to tug-in the
wider, return/purge fuel-line a half-inch or so in at a time. (I wish I had first cut the line itself to 8-inches or so; the line is so cheap, and it probably would have saved me 10 minutes or more.)
I had to lever so as to get almost 180-degree force on the line being pulled down through that VERY-tight hole, hoping to not break the new return-fuel-line.
Here you may be able to see the new replacement return-fuel-line just poking through the roof of the fuel tank:
Here you may be able to see the new replacement return-fuel-line pulled out the the mouth of the fuel tank (with the tail-end plugged onto the primer-bulb for me to get a feel for how things might go):
Nib and new replacement return-fuel-line pulled back into tank GENTLY! until nib just hitting the roof of the fuel tank:
I had cut the new return-line a bit too long:
("Snip!")
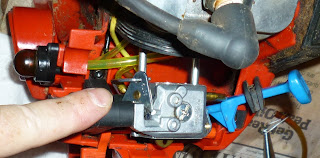
New
narrower fuel-line
from: the primer-bulb-
suction-nipple labeled "CARB" on back-side of primer-bulb housing
to: the
lower nipple on the carb
and
new
wider fuel-line from primer-bulb-
purge fitting labeled "TANK" on back-side of primer-bulb housing through roof of fuel tank (and unseen nib inside the tank):
Oops!! See the fuel lines are
above the wire to the on/off switch.
That ended up pinching them too much when I put the carburetor back on the studs (I could tell because the primer-bulb was not moving in-and-out freely):
I removed the fuel lines from the primer-bulb and re-positioned them
below the wire to the on/off switch:
Before I put everything back together, I made sure the primer-bulb was moving in and out freely (that is: no fuel lines were pinched too tightly) and that the throttle trigger moved smoothly to open the throttle and allow it to close. I didn't forget to make sure the choke knob was positioned properly and moved smoothly.
It took me several tries to get everything back together and working smoothly, but everything worked well in the end.
And so... as regards
the fixya.com post, someone mentioned running fuel lines on this Craftsman model a different way than I did -- I think they made a mistake (That is:
1 >> the narrow fuel-line from the fuel filter in the tank goes to the top of this carb and
2 >> the narrow fuel-line from the bottom of this carb goes to the suction-fitting (labeled "CARB") on the back-housing of the primer-bulb, and
3 >> the wider, return-fuel-line goes from the purge-fitting on the back-housing of the primer-bulb back into the tank and should probably be given back the nib in-tank to discourage the line from popping out of the tank (as was designed, I think, by the manufacturer).
Thanks again Lou and Andrew!! It works again!
(After the fuel lines were replaced, I also had to tweak the carb
settings (lean/rich L/H & idle speed screws. I got some info on
youtube, but probably would have been better-off having a knowledgeable
friend or my local small-engine shop tweak it for me.
This YouTube video was the most helpful to me, and
this video was also very informative, as well as
this third one.) My carb only had spline-screws to adjust Low and High, but I was able to use a small rotary tool with a mini cutting disc to grind out flat-head screwdriver notches in the middle of their ends which worked out great so I saved a few bucks instead of buying a spline driver.
(Gentle reader, please, kindly let me and others know if you think I made any unnoticed mistake here.)


